Eventos Eutromed
Access Style Control
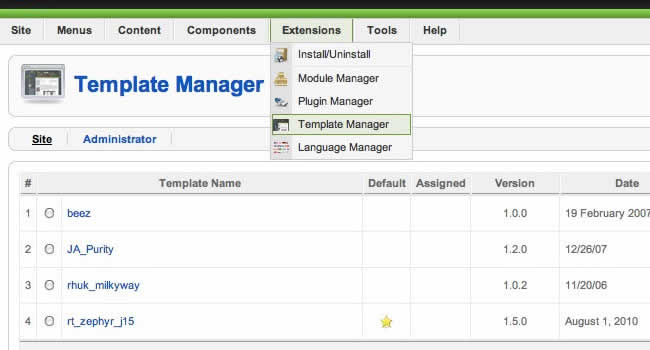
Access the Style Control settings from Admin → Extensions → Template Manager → rt_zephyr_j15 → Settings. Located here are both the Color Chooser and Other Style Controls settings.
Configuration
The options are as follows, and the areas that they control are indicative in their name:
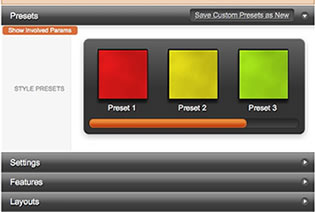
- Style Presets: Preset 1 to Preset 12
- Static CSS: On - Off
- Body Level: High or Low
- Background Image: List of Images
- Color Chooser Options: Main, Header, Body, Footer, Feature, Showcase, Utility, Bottom, Navigation - more information
- Read More Style: Button or Link
- Article Style: Default, Title1-6
- Article Overlay: Light or Dark
- Article Info Style: Layout1-3
- Fixed Footer: On - Off
- Web Fonts: On - Off; Google Font Directory
- Font Settings:
- Font Family: Enigmatic, Geneva, Optima, Helvetica, Trebuchet, Lucida, Georgia, Palatino, or Various Google Fonts (dropdown)
- Font Size: Default, Extra Large, Large, Small, Extra Small (dropdown)
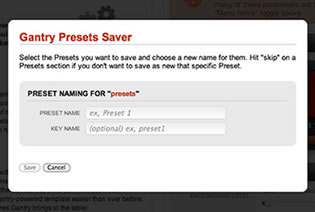
Creating your own Preset Styles
- Go to Extensions → Template Manager → rt_zephyr_j15 → Settings
- Configure the Settings
- Click Save Custom Presets as New
- Follow the Preset Saver procedure
Assigning a Style to a Specific Page
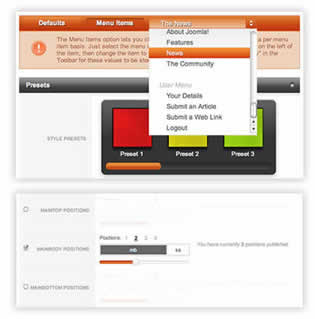
With Gantry, the ability to assign a certain style to an individual page has never been easier and/or more efficient. Just follow these simple steps:
- Go to Extensions → Template Manager → rt_zephyr_j15
- Select the Menu Items tab - located in the right column of the page in the orange box
- Choose a menu item you wish to assign a different style to
- Select your preset of choice from the Presets → Style Presets parameter area
- Configure the Settings area to your personal preferences
- Save
RocketLauncher is a customized Joomla install, that installs a replica of the demo onto your site - inclusive of sample data, content, extensions, the template and sample images.
Step 1 - Upload
- Download the RocketLauncher (rt_zephyr_j15-rocketlauncher.zip)
- Unzip to reveal the rt_zephyr_j15-rocketlauncher folder
- Upload
Step 2 - Installation
- Go to www.yoursite.com/rt_zephyr_j15-rocketlauncher
- Follow the Installation instructions
- Ensure you click Install Sample Data during installation
- Delete the /installation directory on your server
Step 1 - Download
Necessary Files
Files required for the template to function:
- Template (Standalone) rt_zephyr_j15.tgz - Standalone template file.
- Template (Bundle) rt_zephyr_j15-bundle.tar.gz - Template plus Gantry Component.
- RokNavMenu rt_zephyr_j15-extensions.zip(unzip first) or mod_roknavmenu.zip - Required for the menu to work..
Additional Files
Ancillary files for the template:
- Source PNG(s) rt_zephyr_j15-sources.zip - Adobe® Fireworks PNG source file(s) and any applicable fonts.
- Extensions rt_zephyr_j15-extensions.zip - All extensions for the template.
- RocketLauncher rt_zephyr_j15-rocketlauncher.zip - Demo replica installer.
Step 2 - Installation
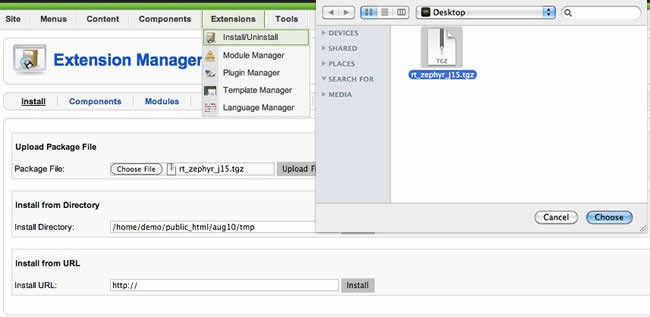
Install from Admin → Extensions → Install/Uninstall → Choose File → Select file → Upload File & Install
Step 3 - Template Default
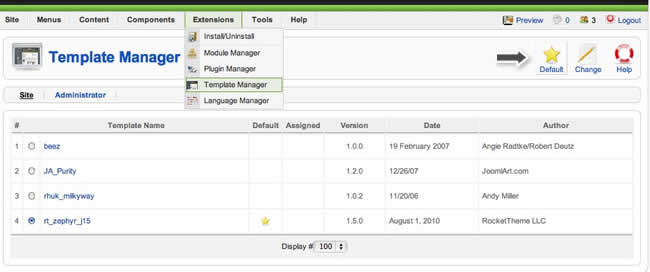
Make the template default at Admin → Extensions → Template Manager → rt_zephyr_j15 → Default
Written Tutorials
Video Tutorials
Forum Tutorials & Guides
Template Configuration & Setup
Go to Extensions → Template Manager → rt_zephyr_j15. Mouseover the labels to view a description of each parameter.
IE6 PNG Fix
To allow for transparent PNG32 images, add class="png" to the element, such as in the examples below:
<img src="images/sample1.png" alt="sample" />
Change to
<img src="images/sample1.png" alt="sample" class="png" />
Third Party Extensions - Compatibility Styling Support
Compatibility styling constitutes basic CSS alterations to better integrate the extensions with the template, rather than full theme integration. Example extensions: K2, Tienda, JComments, Virtuemart and JomSocial.
RocketTheme Extensions
 RokQuickCart A simple shopping cart extension.
 RokStories A versatile content rotator.
 RokAjaxSearch Ajax powered search module.
 RokTabs A mootools tabbed content module.
 RokNewsPager A simple shopping cart extension.
 RokNavMenu Advanced menu system extension.
 RokBox Popup window utility for images etc...
 RokCandy A macro content plugin.
 RokGZipper CSS/JS performance plugin.
 RokPad An advanced code editor for Joomla.
 RokModule Utility addon for Ajax modules.
Learn about all RocketTheme Extensions
")
")


Coordinador
Asociados
![]()
![]()
![]()